Problem
The internet is getting more transformed into an IPv6 pool of addresses. Even though IPv6 has gotten more established and many ISP’s provide IPv6 addresses to their users, there are still many zombie IPv4 networks. For this, there is the concept of port tunnel.
Given you have setup a home server, which is connected via IPv6. On the other hand, your mobile ISP only gives you an IPv4 address. By nature both versions are not compatible with each other. How are you going to get those two devices connected when you’re not in the same local network?
Today I’m going to show you how you can port tunnel your applications on your home server to enable requests from IPv4 clients to IPv6 servers.
Prerequisites
To setup a port tunnel, we will need some things:
- IPv6 home server
- IPv4 client
- another machine that has IPv4 + IPv6 (our tunnel machine)
- socat
Infrastructure
For the DualStack machine, we will use a vServer hoster, since those often have both IPv4 and IPv6 addresses. Uberspace has a unique pricing model and provides their users the freedom we need to setup our tunnel.
Once you have your vServer up and connected, we will need socat. Socat is a relay software that accepts and attempts connections. Basically what we will do is open a tcp/udp listener which tunnels a requested connection to a destination target. Responses will also be sent over the tunnel. As an example, we can setup a tunnel for a VPN Server running on our home server. That way, we can access all other applications on the network, since we’re virtually in the local network. Then our connection flow looks like this:
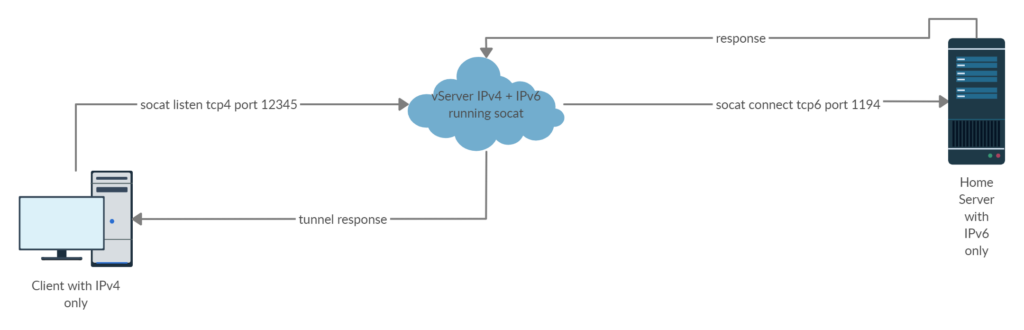
The client connects to the tunnel instead of the VPN server because they can both communicate via IPv4. The tunnel accepts the request and directs it to the actual VPN server. The responses are being directed back to the client.
Socat tunnel
First, decide for an open port to use on your vServer to let the client connect to. In uberspace, you’ll have to use their tool for simpler port forwarding.
uberspace port add
Next, you’ll need an address to let socat connect to. This can be the IP address of your home server. Typically you may have setup a domain. Lets evaluate all inputs that we have:
| tunnel port | example 12345 |
| target port | 1194 |
| target address | example server.domain.com |
With those inputs, we can assemble the socat command:
socat tcp4-listen:12345,fork,reuseaddr tcp6-connect:server.domain.com:1194
That’s it. Now we should be able to connect to our VPN server via the tunnel. To make things convenient, we can also setup a supervisor daemon in case socat crashes:
[program:vpn]
command=socat tcp4-listen:12345,fork,reuseaddr tcp6-connect:server.domain.com:1194
autostart=yes
autorestart=yes
Security
Security is a point to consider when setting up such a tunnel. If socat tunnels on plain TCP/UDP, then there are no security measures involved.
In our example, we used a VPN server which encrypts all packets before exposing them to hard wires. All data in-between the tunnel stays encrypted, because the tunnel has no information about any encryption. Only the client knows how to decrypt the data, hence only the client knows what the data is. Even when attackers sniff the packets, they would only see encrypted gibberish.
Socat also supports TLS connections. Instead of listening to TCP connections, it can hook in at one higher layer: TLS. For tunneling you need at least two certificates. One for socat to validate your target and one to provide the client. You can then provide those certificates to socat which uses them with openssl. It is worth mentioning that this way the data gets decrypted and encrypted again, all on the vServer.